
Creating an Inventory Adjustment Including an Item Bin Number using CSV Import
NetSuite has listened to the requests of many consultants and end-users and has provided us a new capability that allows for utilizing CSV Import to create Inventory Adjustments with Bins.
The NetSuite CSV Import feature provides the ability to create Transactions using imported data. One such Transaction is an Inventory Adjustment. Inventory Adjustment transactions are used to record changes in On-Hand Quantity or Average Cost. The focus here is on increasing or decreasing On-Hand Quantity for an Item that is setup to Use Bins. NetSuite provides the ability to add the Bin # when Importing Inventory Adjustment transactions.
The following is a description of how to build a CSV Import for Inventory Adjustments to accommodate Items using Bins.
Sample Use Case:
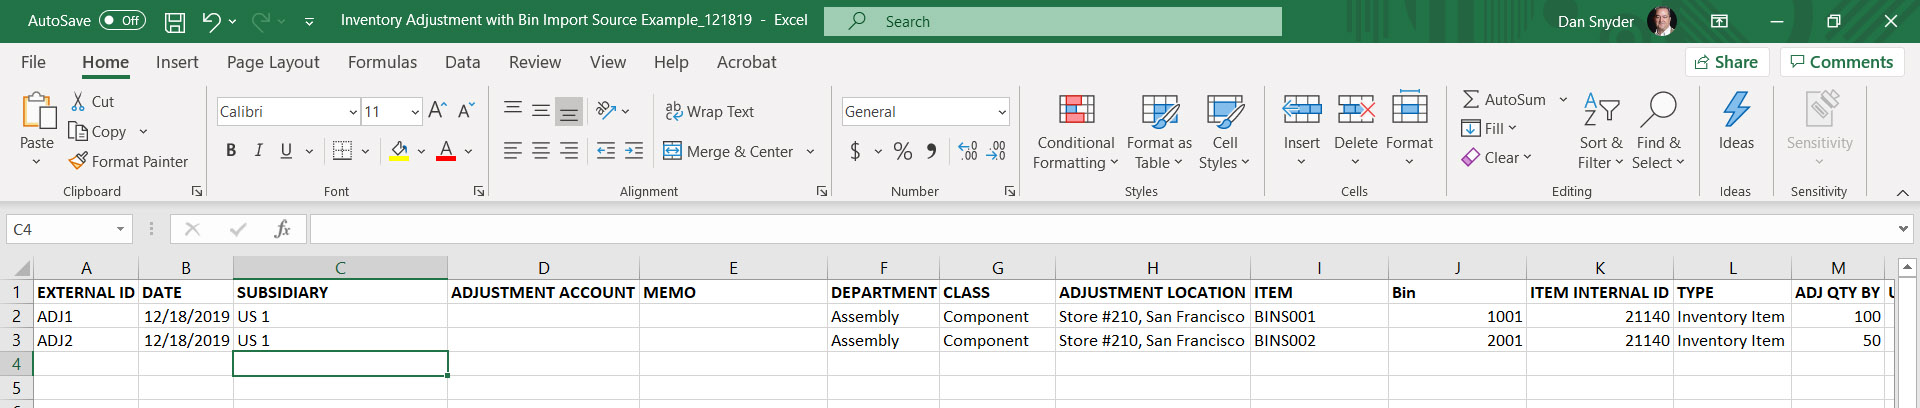
- The Item being used is BINS001. This is a Non-Serialized Inventory Item with Use Bins checked.
- Item # BINS001 is assigned to Bin # 1001 in a Location called US East Distribution Center.
- Item # BINS002 is assigned to Bin # 2001 in the US West Distribution Center Location.
- The objective of this exercise is to:
- Increase On-Hand quantity by 100 in Bin # 1001 at the US East Distribution Center Location.
- Increase On-Hand quantity by 50 in Bin # 2001 at the US West Distribution Center Location.
- The Department and Class Segments are entered on transactions in the Header (Main Line) section. The Department “Assembly” and Class “Component” will be used in this example.
Assumptions:
- A properly formatted Import source file has been created.
- Menu paths are assuming the Administrator Login is used.
External ID in Import Source File
Each row to be included in the same Inventory Adjustment Transaction must have the same External ID. The External ID dictates which lines in the import source file are grouped together in a single Inventory Adjustment transaction.
In this example, both Items BINS001 and BINS002 will be included in a single transaction:

In this example, Item BINS001 will be in one transaction and Item BINS002 will be in a separate transaction. Note the different External IDs (Column A):
In this exercise, we are creating two separate transactions, one for each Item.
Build CSV Import
To create the Import, navigate to Setup > Import/Export > Import CSV Records.
Import Step 1: Scan and Upload CSV File
Select:
- Import Type = Transactions
- Record Type = Inventory Adjustment
- Character Encoding: use default value Western (Windows 1252)
- CSV Column Delimiter: use default value Comma
- Select One File to Upload and select the completed CSV file. Then click Next.

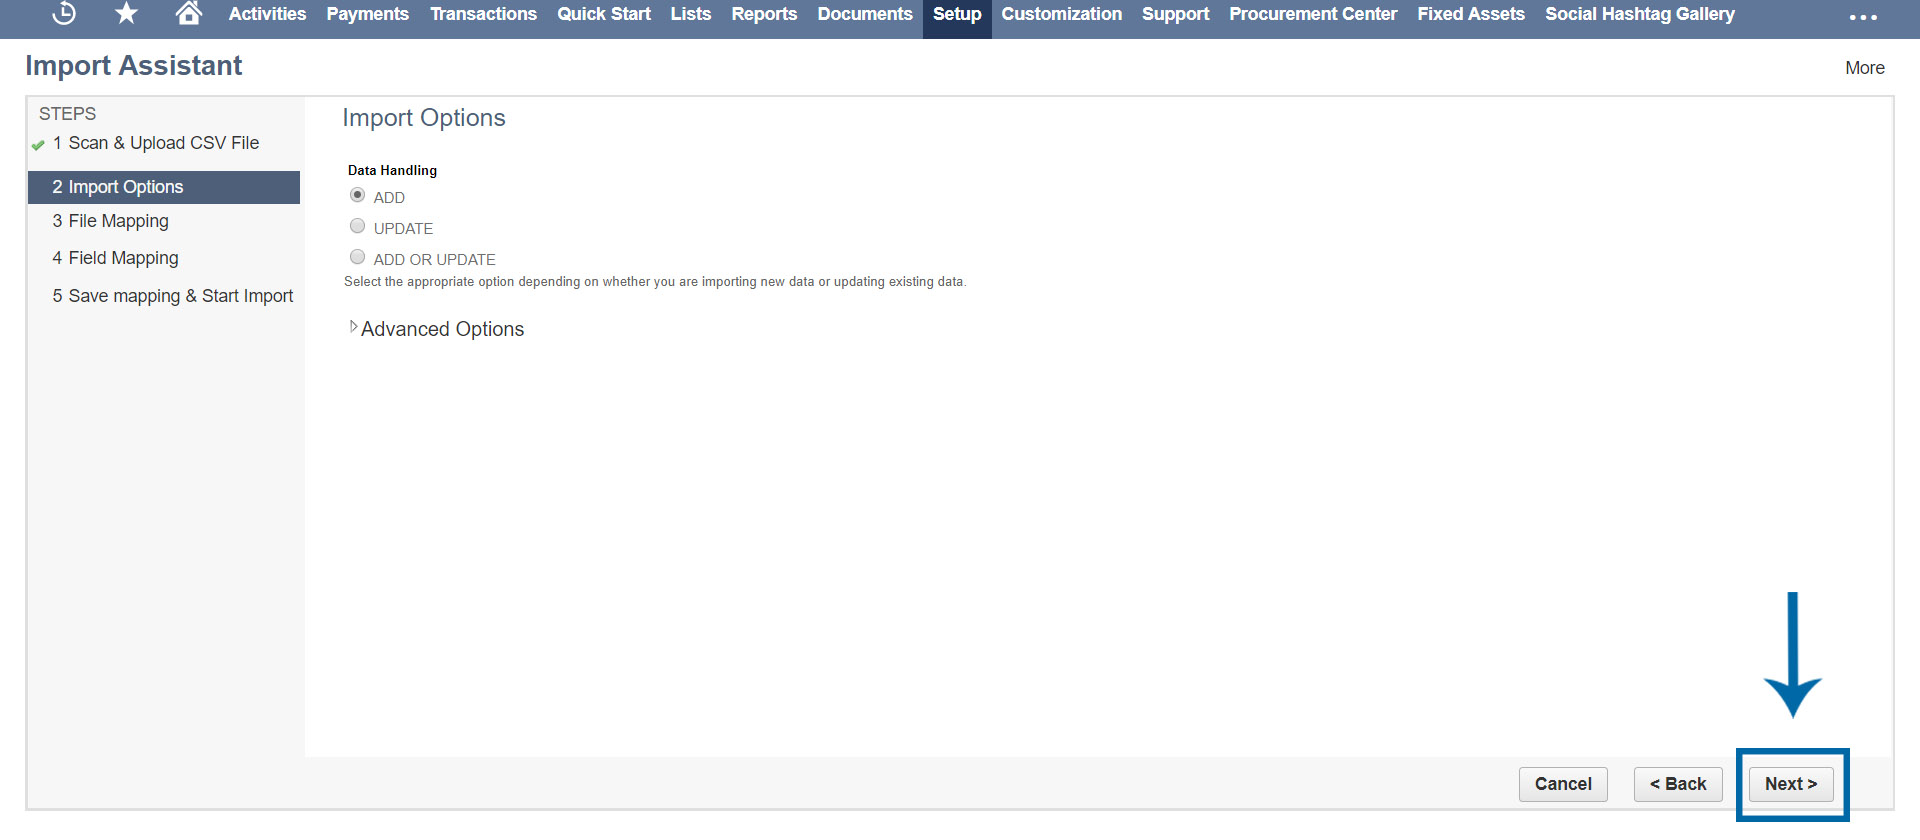
Import Step 2: Import Options
- Select “Add”. In this case, we are creating, or Adding, two Inventory Adjustment transactions, each with one line. Then click Next.
- Note: Ignore Advanced Options. Using the wrong Form is a common error. The Custom Form can be changed under Advanced Options.
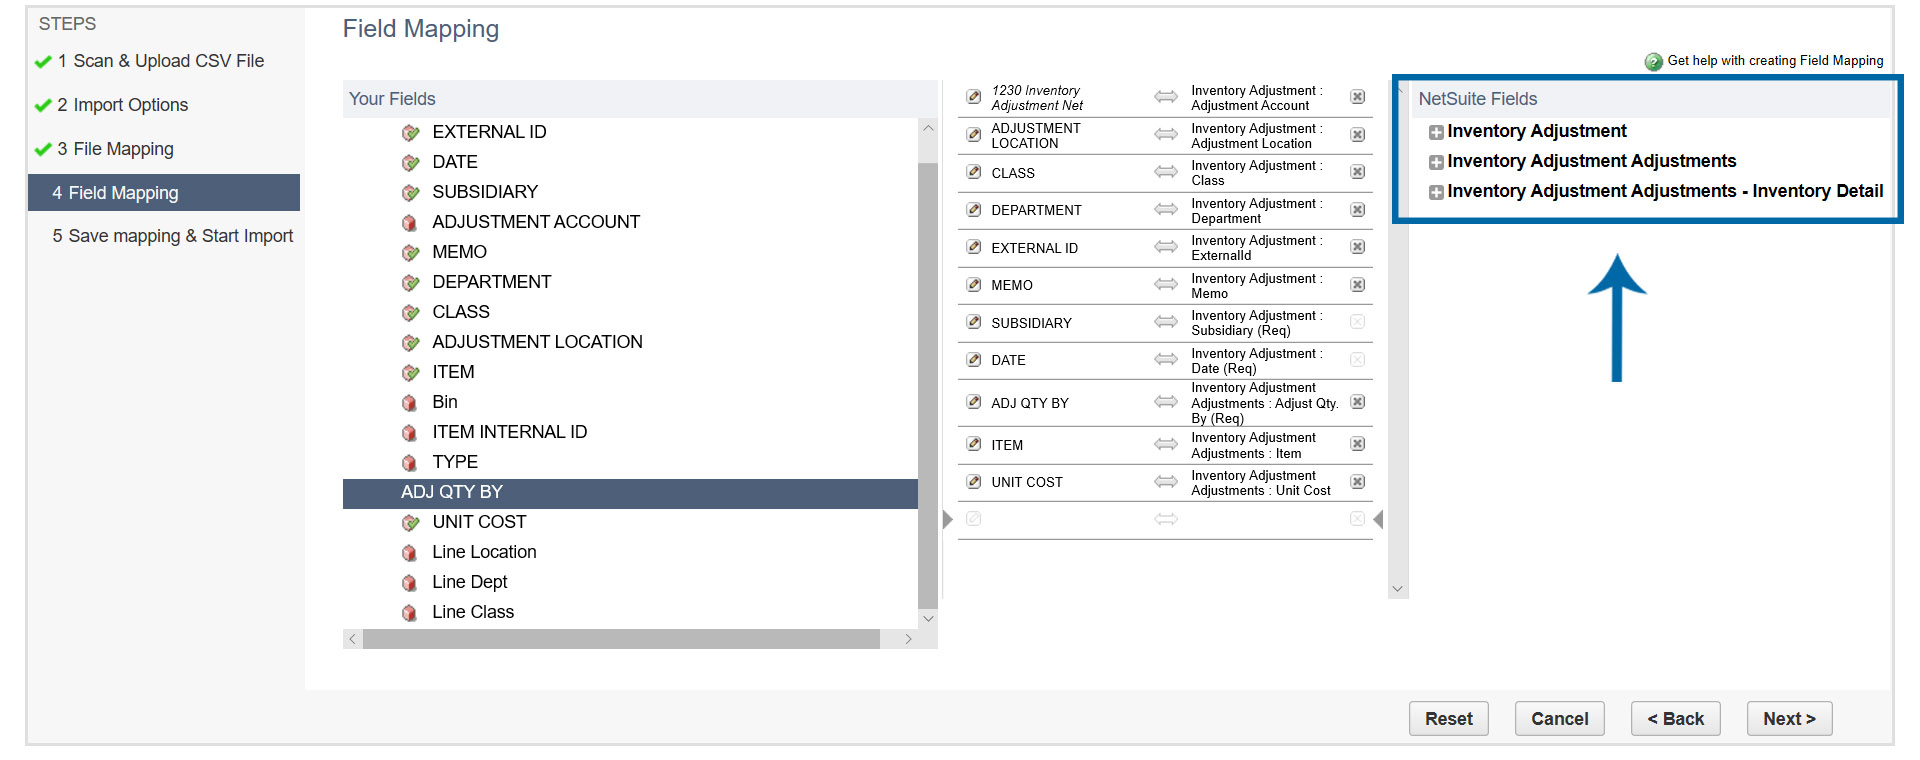
Import Step 4: Field Mapping (NetSuite skips Step 3: File Mapping when doing single-file Imports).
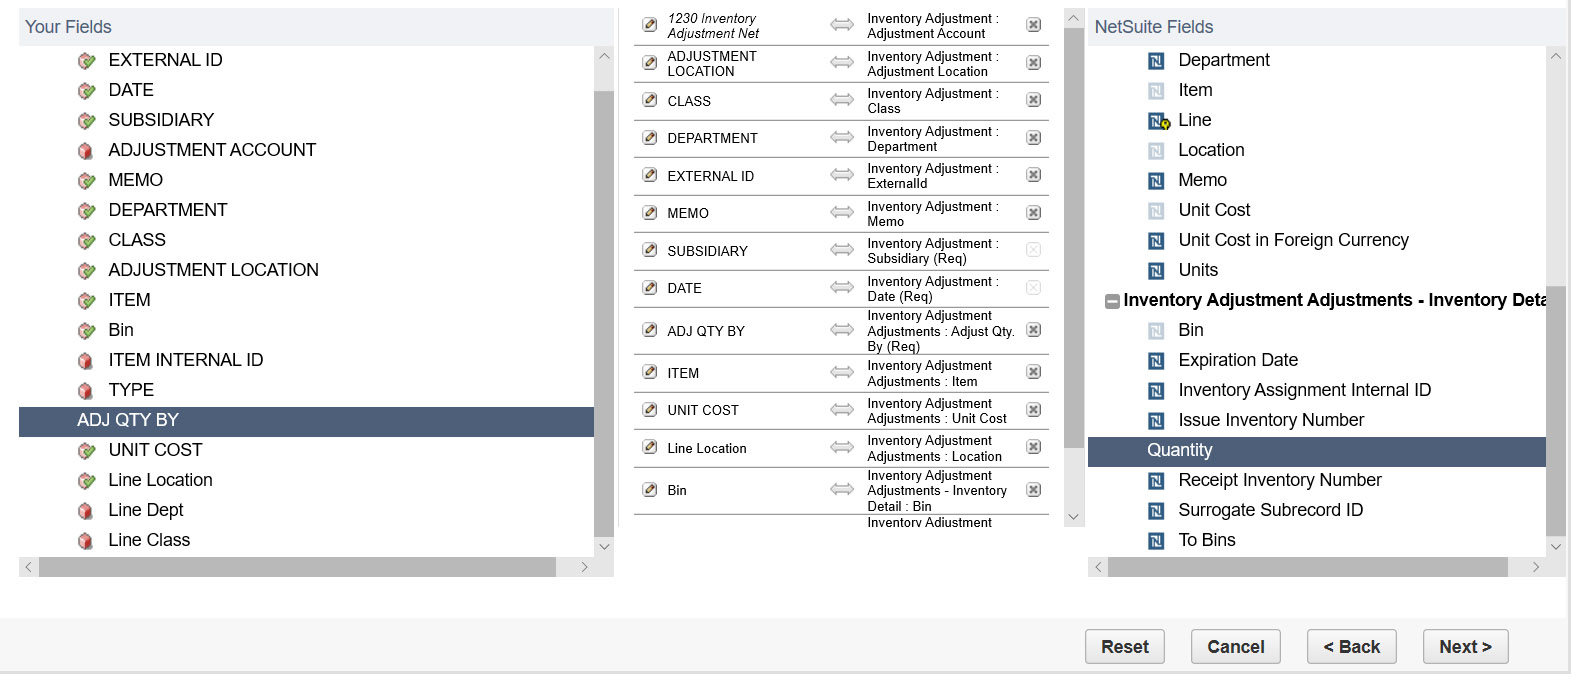
This is where you actually set up the field mapping. We are mapping the fields in the .csv source file to the proper NetSuite field. To build the mapping go row by row. Start with the NetSuite field list on the right, select the NetSuite destination field. The cursor will move to the next row, place it back on the row where you just selected the NetSuite field. Then select the desired source field form the list on the lift, which is the CSV source file. Repeat until all fields are mapped.
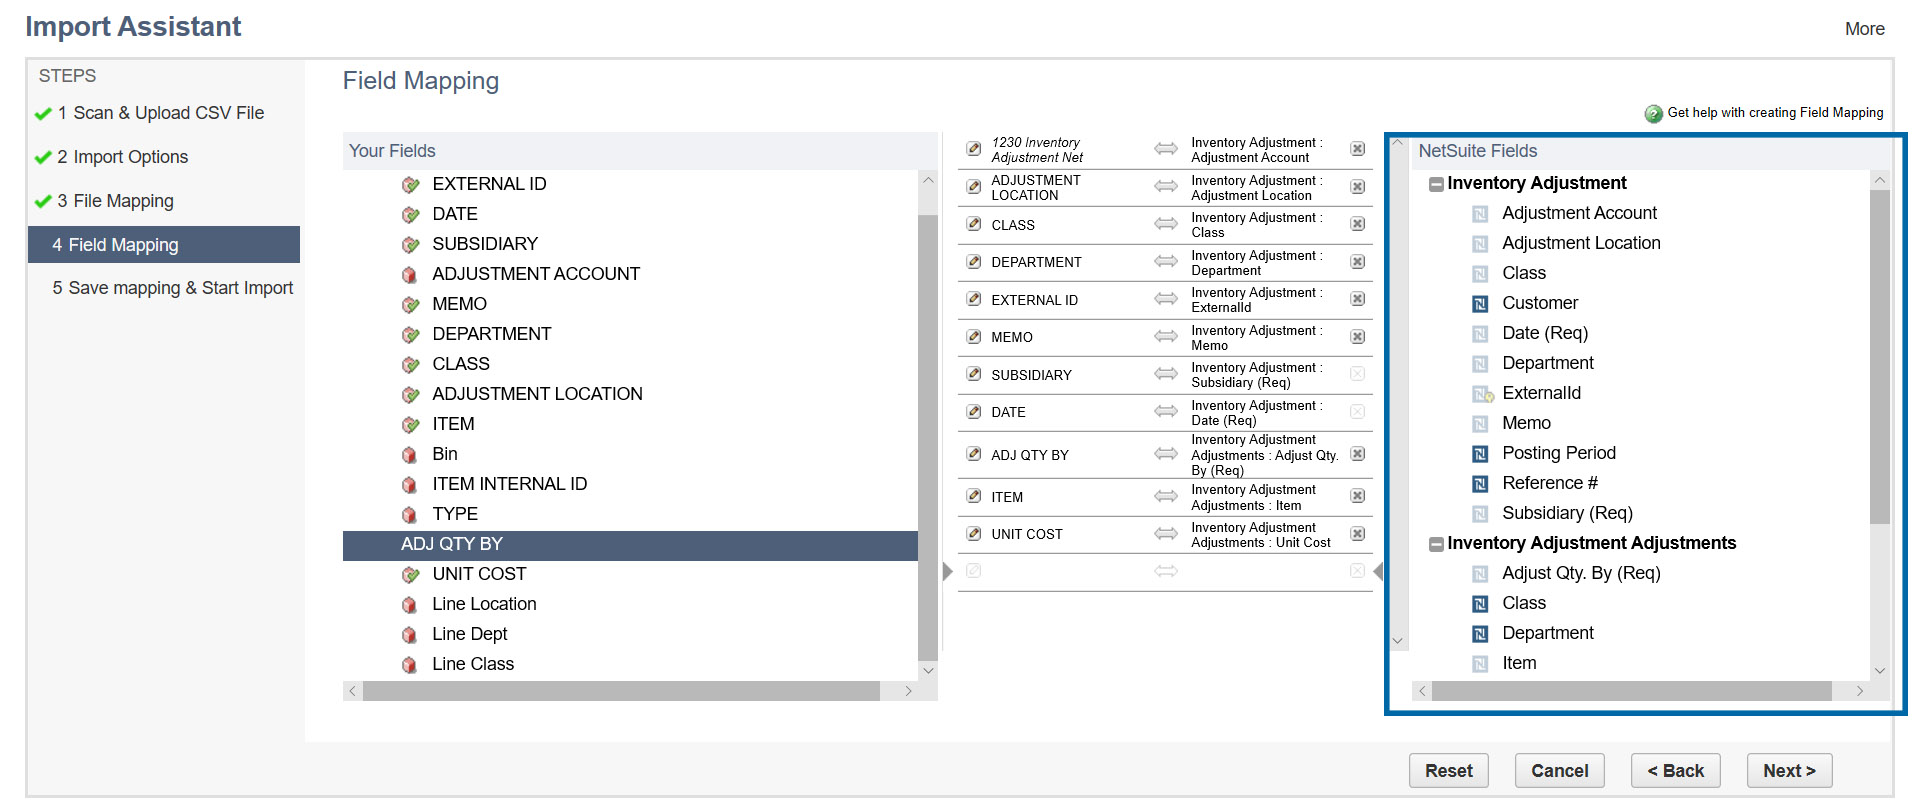
The NetSuite fields are on the right-hand side of this page. We are dealing with three NetSuite records in this particular Import:
- Inventory Adjustment (Header of the transaction – examples of fields are Date, Adjustment Account, Adjustment Location)
- Inventory Adjustment Adjustments (Transaction Line. Field examples are Item, Cost, Adjust Qty By)
- Inventory Adjustment Adjustments – Inventory Detail
We will be including fields from each of these three records in this import. Use the plus buttons to expand each record and see the list of fields.
Below is the view once the records are expanded. The dimmed fields are the ones that are included in the field mapping of the Import:
The following NetSuite fields will be included in the Field Mapping:
- Adjustment Account (Select the account to use in the field mapping. See screenshot below.)
- Adjustment Location
- Class (Header/Main Line)
- Department (Header/Main Line)
- External ID
- Memo
- Subsidiary
- Date
- Item
- Unit Cost
- Adj Qty By
- Location (Line)
- Bin
- Quantity
Fields # 1-8 are listed under the Inventory Adjustments record, #’s 9-12 listed under the Inventory Adjustment Adjustments record and#’s 12-13 are listed under the Inventory Adjustment Adjustments – Inventory Detail record. Note that the Inventory Detail record has a Quantity field that must be included as well as the Bin #. This can be mapped to the same field in the CSV source file that is mapped to the NetSuite filed Adj Qty By.
Note: The Subsidiary field is necessary only in OneWorld deployments of NetSuite.
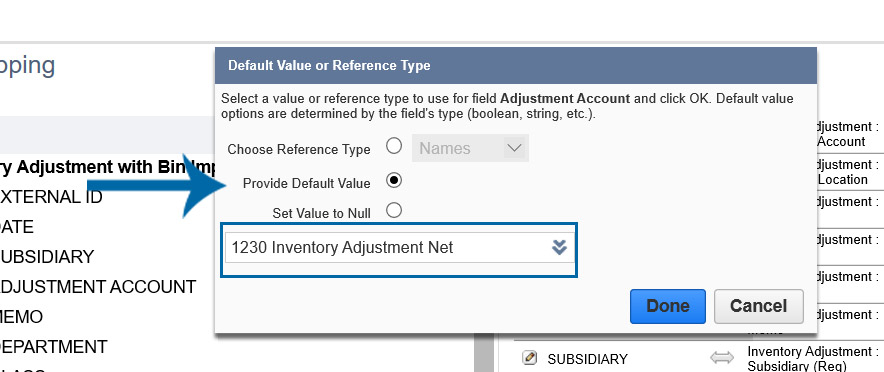
To Select Default Value for Adjustment Account:
- Click the edit icon to the left of the field name:

Select the default account:
Field Mapping Screen:
The end result will appear as follows:
Click Next when finished mapping and go to the last screen in the Import Setup.
Step 5: Save mapping & Start Import
This is where you Save and Run the Import. Name the Import, select Save & Run.

After Saving:
Click the Import Job Status Link to see progress.

All done!
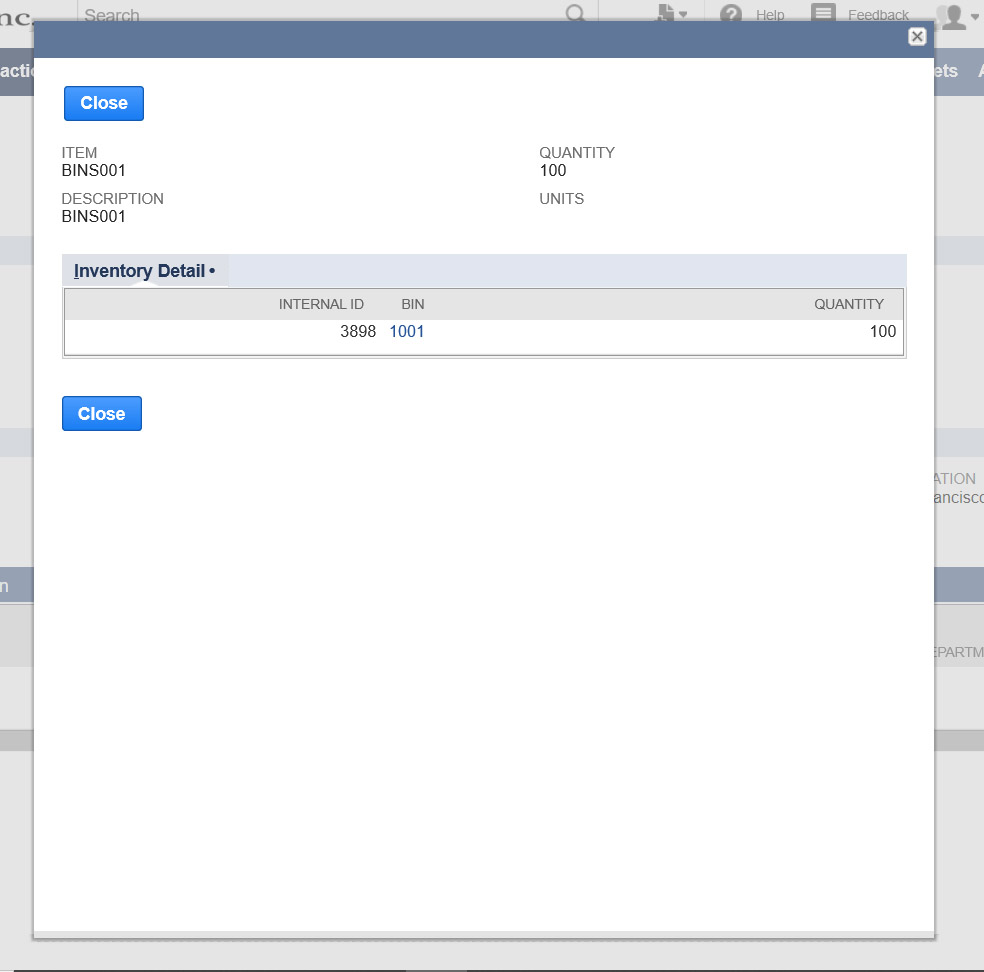
End Result for BINS001, click Inventory Detail icon to see the Bin #:

For more information on NetSuite, or using CSV Import for Inventory Adjustments with Bins, contact Keystone today!
![]()
Keystone. Your NetSuite solution provider and integration partner.
Call – 866-546-7227 | Email – info@keystonebusinessservices.net


